The vacuum pump is the heart of any vacuum packaging machine—and also its most expensive component, typically accounting for 30–50% of the total machine cost. A replacement can easily set you back $1,000 or more, not to mention the lost production time while your line sits idle.
Yet many maintenance teams treat the vacuum pump as an afterthought—until it fails. The good news? Most vacuum pump failures are entirely preventable. With a structured maintenance routine, you can extend your pump’s service life significantly, reduce unplanned downtime, and save thousands of dollars in replacement and repair costs.
This guide provides a practical, actionable maintenance checklist organized by daily, weekly, monthly, and annual tasks. Follow it consistently, and your vacuum pump will reward you with years of reliable service.
These quick checks take just a few minutes each day but prevent many unplanned downtimes.
Verify that the oil is at the centre of the sight glass and appears clear (not milky, dark, or sludgy). Top up with the correct vacuum pump oil if low; if the oil is contaminated, schedule an immediate oil change.
Start the pump and listen for any abnormal noises (knocking, grinding, high‑pitched whining). Simultaneously, inspect for excessive vibration, visible oil leaks, or loose hose connections. Any deviation from normal operation signals potential wear and warrants further investigation.
Remove the inlet air filter and check for visible clogging, dust accumulation, or debris. Clean or replace the filter as needed to ensure unrestricted airflow and prevent the pump from overworking.
If your packaging process involves wet or moist products, water vapor can contaminate the oil quickly. In such conditions, change the oil more frequently—potentially weekly.
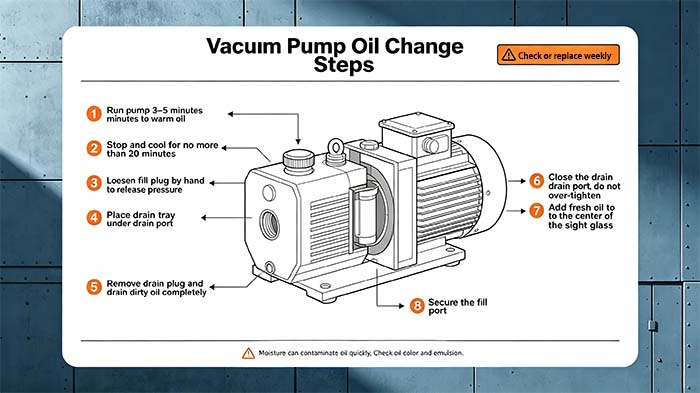
Standard oil change procedure:
Run the pump for a few minutes to warm the oil—warm oil flows more easily.
Shut down the pump and allow it to cool for no more than 20 minutes.
Remove the oil pouring plug by hand to release internal pressure.
Place a drain tray under the drain port.
Remove the oil drain plug and drain the dirty oil completely.
Close the drain port—do not over-tighten.
Insert a clean funnel into the fill port and fill with fresh, correct-grade vacuum pump oil until it reaches the center of the sight glass.
Close the fill port securely.
Inspect the vacuum pump for any signs of oil leakage. If leaks are detected, have the pump repaired promptly.
Check all hoses and seals for softening, cracks, porous areas, or deformations. Heat can weaken their structural integrity over time.
This is one of the most important diagnostic tests you can perform. A drop in performance is an early indicator of wear.
Procedure:
Close the vacuum chamber and seal the inlet.
Run the pump for approximately 2 minutes.
Record the vacuum gauge reading.
Compare it to the pump’s baseline performance and manufacturer specifications.
If the ultimate vacuum has dropped by 20% or more from the baseline, internal wear is likely.
If your pump and motor are connected via a coupling, inspect the coupling rubbers/buffer elements. Worn coupling rubbers can be detected by a knocking sound when the pump starts. Defective coupling rubbers can cause extensive damage and, in extreme cases, break the rotor shaft. Replace if any wear is visible.
Overheating is one of the leading causes of vacuum pump failure. Regularly remove dust from the motor and keep the heat sink clean to increase heat dissipation capacity.
Additional overheating prevention measures:
Ensure the pump is installed in an area with adequate ventilation and sufficient space around it.
Verify that intake and exhaust vents are not obstructed.
A clean surface radiates heat much more effectively than a dirty one.
Warning: Pump surface temperatures can exceed 70°C during normal operation. If the pump is hot enough to burn on contact, overheating is occurring.
Ensure the exhaust filter is working properly. A clogged exhaust filter creates back pressure that forces the pump to work harder, generating excess heat.
Some maintenance tasks require technical expertise and should be performed by a trained service technician.
Rotary vane pumps experience vane wear over time. When vanes reach their minimum height, replacement is necessary—failure to do so will result in vane breakage and potential scoring of the pump chamber. Annual inspection and replacement of wear parts should be performed.
Over time, oil sludge and contaminants can clog internal passages. An annual cleaning of the oil circuit and silencer removes built-up deposits and restores pumping efficiency.
Ensure the vacuum switch or pressure sensor is accurately calibrated. Incorrect calibration can lead to improper cycle timing, reduced packaging quality, and unnecessary pump wear.
A comprehensive annual service should include:
Replacement of wear parts
Inspection of motor, bearings, fan, and electrical connections
Inspection of all seals and gaskets for wear, cracks, or leaks
Catching pump failure early can save you from costly downtime and unexpected repairs. Watch for these warning signs:
| Warning Sign | What It Means |
|---|---|
| Vacuum performance drop of 20%+ | Internal wear, worn vanes, or seal degradation |
| Oil turns black quickly after change | Severe internal wear—metal particles are contaminating the oil |
| Abnormally high operating temperature | Blocked cooling, degraded oil, or excessive internal friction |
| Metal-on-metal grinding or rattling at startup | Worn bearings, broken vanes, or coupling failure |
| Milky or discolored oil | Water contamination—common when pumping moist products |
| Smoke or oil mist from exhaust | Blocked oil mist filter, overfilled oil, or worn internal seals |
If you notice any of these signs, don’t wait. Ignoring the symptoms can lead to reduced efficiency, increased energy consumption, complete system shutdown, and higher long-term repair or replacement costs.
Consider a meat processing facility that never changes its vacuum pump oil. The pump runs 8 hours a day, 5 days a week.
Month 8: The pump seizes due to oil degradation and contamination.
Downtime: 3 days of production lost while waiting for a replacement pump.
Lost profit: $5,000 from halted production.
Replacement pump cost: $2,000.
Total loss: $7,000.
Now consider the preventive approach:
Monthly oil changes: $20/month in oil costs.
8 months of maintenance: $160 total.
Result: Pump continues running reliably for years.
The math is simple: proactive maintenance costs roughly 5% of a reactive replacement.
This is not an isolated example. In food packaging facilities, production line downtime can cost $200–500 per hour due to vacuum loss. Each vacuum pump breakdown has been estimated to cost $8,000 to $9,000 when factoring in repair parts, labor, and production losses.
Having critical spare parts on hand minimizes downtime when maintenance or repairs are needed. Recommended inventory:
| Part | Quantity | Why You Need It |
|---|---|---|
| Vacuum pump oil | 2 containers | Regular oil changes; oil is the pump's "lifeblood" |
| Inlet air filter | 2 units | Clogs reduce performance and overwork the pump |
| Exhaust filter | 1 unit | Prevents back pressure and oil mist issues |
| Vane kit | 1 set | Vanes wear and must be replaced periodically |
| Seal/gasket kit | 2 sets | Seals degrade from heat and chemical exposure |
For dry-running rotary vane pumps, stock essential parts such as carbon vanes, inlet filters, exhaust filters, and gaskets.
No. Running a pump with low oil is one of the fastest ways to destroy it. Oil provides lubrication, sealing, and cooling. Low oil means inadequate lubrication—vanes run dry, friction increases, and catastrophic failure can occur within minutes. If the oil level has dropped below the MIN mark, top it up immediately.
Always use the oil specified by your pump manufacturer. Vacuum pump oils are specially formulated with specific viscosity and vapor pressure characteristics. Using motor oil, hydraulic fluid, or the wrong grade of vacuum oil will lead to overheating, poor vacuum performance, and premature pump failure.
Yes. While dry (oil-free) pumps don't require oil changes, they still need regular maintenance. Dry pump vanes are designed to wear down at a set rate. Each maintenance cycle must include vane measurement—when vanes reach minimum height, replacement is necessary. Inlet filters, exhaust filters, and seals also require periodic inspection and replacement.
A vacuum pump is too expensive to replace—and downtime is too costly to ignore. The maintenance tasks outlined in this guide require minimal time and investment but deliver maximum return:
Daily: 5 minutes of visual inspection, oil level check, and listening.
Weekly: 15 minutes for oil changes and leak checks.
Monthly: 30 minutes for performance testing, coupling inspection, and cleaning.
Annually: 1 hour for vane replacement and comprehensive inspection.
The bottom line: preventive maintenance costs roughly 5% of a reactive replacement. A $20 monthly oil change can prevent a $7,000 failure.
Don't wait for your pump to fail. Start your preventive maintenance program today—and keep your packaging line running for years to come.

GET A QUOTE