Nothing stops a packaging line faster than a failed seal. You pull a finished vacuum bag off the machine only to watch air rush back in—or worse, discover a pallet of product that lost its seal two hours ago. For production supervisors and maintenance teams, causes of vacuum packaging machine sealing bar failure are not just a technical puzzle; they are a direct hit to throughput and food safety.
The good news is that 80% of sealing issues fall into six predictable failure modes. This guide provides a symptom–cause–solution map for each. By the end, you will know exactly why your heating element is not working, how to spot an uneven vacuum packer seal, and when to replace the teflon tape before it causes a shutdown.
Symptom:
You run a cycle, but only half of the seal width is fused. The left side looks perfect; the right side is still open. If you touch the sealing bar immediately after a cycle, one end is hot while the other is at room temperature.
Root Cause:
This is a classic sign of a broken or partially disconnected heating element. Commercial heating elements are typically Nichrome wires that run the length of the bar. Over time, vibration and thermal expansion cause a fracture at the terminal connection. Less commonly, a loose set screw on the terminal block creates high resistance—enough to stop current flow to the distal end.
Solution:
Replace the entire heating element assembly. Do not attempt to splice or solder a broken Nichrome wire; the joint will fail immediately under heat.
Step-by-step fix:
Disconnect power and air supply.
Remove the Teflon tape and upper silicone pad.
Loosen the terminal screws securing the heating wire.
Pull out the old wire. Note the exact length and diameter.
Install the new wire with slight tension—enough to lie flat but not guitar-string tight.
Tighten terminals and measure resistance with a multimeter.
Symptom:
The bag looks sealed, but you can pull it apart with light finger pressure. The seal line has a wrinkled or “puckered” appearance. In some cases, the bag holds a vacuum for a few minutes but slowly leaks overnight.
Root Cause:
A weak seal typically has three possible origins. The most common is insufficient heating time—the polymer never reached its melting point. The second is voltage drop, which reduces wire temperature. The third is a hardened or cracked silicone pad. The silicone pad provides counter-pressure; when it ages, it cannot force the molten film layers together.
Solution:
Work through the three causes systematically:
Increase seal time by 0.2-second increments. Most commercial bags seal well between 1.2 and 2.0 seconds. Do not exceed 2.5 seconds or you risk melting (see Failure Mode 3).
Check the supply voltage during a cycle. If the voltage sags below 90% of nominal, call an electrician. Shared lines with heavy motors are common culprits.
Inspect the silicone pad. Flip it over if one side is worn. Replace if it has deep compression marks or a glazed surface.
A vacuum packer seal uneven across the bag length almost always points to a silicone pad that has swelled or flattened unevenly in the middle.
Symptom:
You open the chamber to find a hole melted clean through the bag at the seal line. Or the seal area is transparent and brittle, cracking when flexed. A burnt smell is obvious.
Root Cause:
Too much heat energy is transferred to the bag. This is almost always operator error in settings: excessive seal time (over 2.5 seconds) or excessive seal pressure. However, sometimes the bag material itself is the issue. A 2-mil bag cannot withstand the same heat as a 4-mil bag. If you recently switched to a thinner bag without adjusting parameters, burn-through is inevitable.
Solution:
Reduce seal time in 0.2-second increments until the seal holds without burn.
Lower seal pressure if your machine has adjustable pressure (common on double-chamber units).
Match the bag to the machine. For very thin bags (under 3 mil), reduce seal time to 0.8–1.0 seconds.
Verify the heating element is not working at a higher voltage than rated. Some heating wires drop resistance as they age, drawing more current.
Symptom:
The machine seals perfectly for 10 cycles, then suddenly skips a cycle—no heat at all. The next cycle works fine. Intermittent faults are the hardest to diagnose because the problem disappears when you look for it.
Root Cause:
In 90% of cases, the culprit is a failing relay. The relay is an electromagnetic switch that turns power to the sealing bar on and off. After hundreds of thousands of cycles, the relay contacts develop pits and carbon deposits. These deposits create a random open circuit. The remaining 10% of intermittent faults come from loose ribbon cable connectors on the control board, especially on machines with digital displays.
Solution:
Do not guess. Use a multimeter to test the relay:
Unplug the machine and remove the control panel cover.
Identify the sealing relay.
Apply power and run the machine with the bag chamber open.
Listen for a distinct “click” from the relay each cycle. No click? The coil is dead.
If it clicks, measure continuity across the relay’s output terminals during the seal cycle. You should see near-zero ohms. If resistance jumps or reads open, replace the relay.
Replace with an identical relay. Generic automotive relays are not suitable; use a brand-name industrial relay.
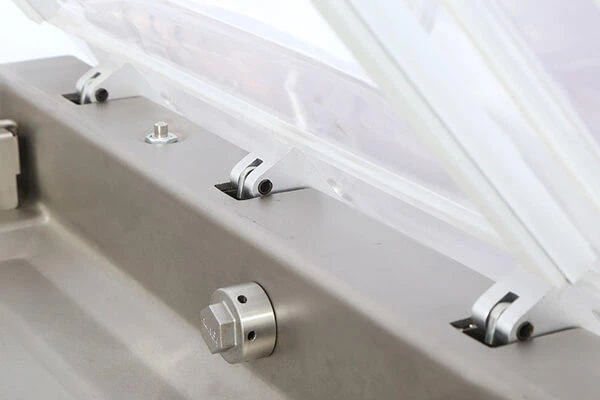
Symptom:
The bag sticks to the sealing bar after the cycle, requiring you to peel it off. The seal line has black, crusty residue. Sometimes you see small burn marks on the bag where melted plastic transferred.
Root Cause:
The Teflon (PTFE) tape is the release layer. It prevents melted bag material from adhering to the hot sealing wire. Over time, the Teflon coating wears thin from friction and heat. Once the underlying fiberglass or the heating wire itself is exposed, molten plastic bonds directly to the metal. That black residue is carbonized plastic. A damaged tape also causes the vacuum packer seal to be uneven because the sticky spots create uneven tension.
Solution:
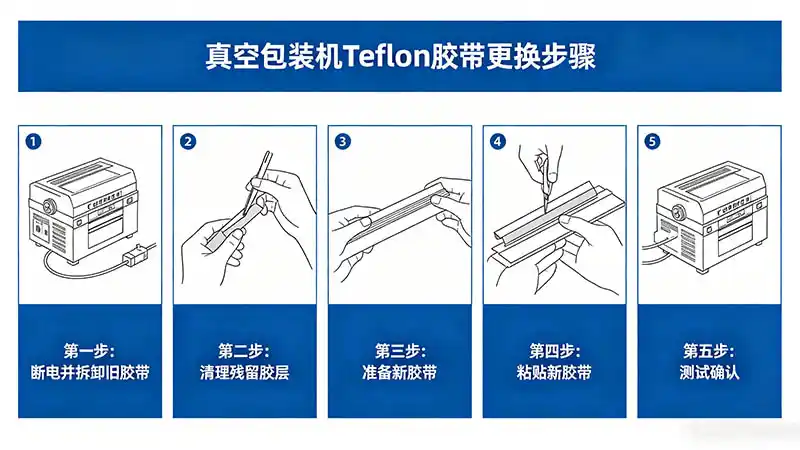
Perform a complete teflon tape replacement. This is a 5-minute preventive task that operators can do daily.
Replacement steps:
Allow the sealing bar to cool completely.
Peel off the old tape. Scrape off any black residue with a wooden or plastic scraper (metal will scratch the bar).
Clean the bar with isopropyl alcohol and a lint-free cloth.
Cut new Teflon tape 1 inch longer than the sealing bar.
Peel back 1 inch of the adhesive liner on one end. Stick it to the underside of the bar.
Pull the tape across the bar with light, even tension. Do not stretch it.
Fold the remaining tape under the opposite end. Smooth out all air bubbles with your finger.
Run one test cycle with a scrap bag to confirm release.
Symptom:
You see green, white, or blue powdery deposits on the heating wire or its terminals. The seal quality is inconsistent, and the wire may break unexpectedly during a cycle.
Root Cause:
Corrosion occurs when acidic or salty food juices drip onto the sealing bar. Common offenders: marinated meats, pickled vegetables, brine-injected poultry, and citrus-based products. The moisture combined with heat accelerates galvanic corrosion. Standard Nichrome wire is not chemically resistant.
Solution:
Immediate fix: Replace the corroded wire with a stainless steel heating element rated for food contact. Stainless steel has higher electrical resistance than Nichrome, so you must use the exact length and gauge specified for your machine.
Prevention: Install a drip shield or angled cover above the sealing bar. Train operators to wipe down the bar after every run of acidic products.
Long-term: Upgrade to a machine with an IP65-rated sealing zone if you frequently package corrosive foods.
Do not ignore corrosion. The powder is conductive and can create a short circuit that damages the control board.
Reactive maintenance is expensive. A structured preventive schedule eliminates 80% of sealing bar failures. Post this checklist near your vacuum packer.
Daily (Every Shift)
Inspect Teflon tape for nicks, scratches, or burned spots.
Wipe the sealing bar and silicone pad with a damp cloth.
Run one test seal on a scrap bag before starting production.
Weekly
Clean melted residue from the heating wire using a brass brush.
Inspect the silicone pad for flatness. Rotate or flip if uneven wear is visible.
Verify all terminal screws on the heating wire are tight.
Monthly
Measure the heating element’s resistance with a multimeter. Record the value. Compare to the specification in your manual. A 15% drift indicates aging.
Check the seal time calibration. Use a stopwatch to verify that 1.0 seconds on the display equals 1.0 actual seconds.
Quarterly
Replace the Teflon tape, even if it looks okay. PTFE degrades invisibly.
Replace the silicone pad if it has been in service for more than 6 months.
Test the sealing relay: run 50 cycles in a row and verify consistent heating every cycle.
Q1: Can I use any sealing wire as a replacement?
No. Sealing wires vary by resistance (ohms per foot), diameter, and alloy. Using a wire with lower resistance will draw more current, potentially tripping breakers or burning out relays. Always order the exact part number from your machine manufacturer or an authorized supplier like KUNBA. Generic “universal” wires cause more failures than they solve.
Q2: Why does my sealing bar spark?
Sparking at the terminals indicates a loose electrical connection. Stop using the machine immediately. Loose connections generate heat that can melt terminal blocks or start a fire. Turn off the power, tighten the terminal screws, and apply a small amount of dielectric grease. If sparking continues, the terminal block itself may be cracked.
Q3: How long should a heating element last?
In a commercial environment running 8 hours per day, expect 6–12 months from a Nichrome heating wire. Stainless steel wires last 2–3 years but heat slightly slower. Teflon tape is the real consumable: replace it every 3 months regardless of condition. A heating element not working after only a few weeks usually indicates a deeper electrical problem, not a defective wire.
Sealing bar failures are inevitable—but they are also predictable. By learning to distinguish between a burned-out wire, a weak seal from an aged silicone pad (Failure Mode 2), and intermittent heating from a faulty relay, your maintenance team can cut diagnostic time from hours to minutes.
The single highest ROI action you can take is systematic teflon tape replacement every 90 days. This one habit prevents bag sticking, uneven seals, and carbon buildup that hides underlying issues.
Don't wait for a production-stopping failure. Stock genuine spare parts before you need them.
Shop KUNBA’s spare parts store for OEM heating bars, Teflon tape rolls, silicone pads, and replacement relays. Every part comes with a one-year warranty and same-day shipping. Keep your line running.

GET A QUOTE